

后台定位 最后更新时间: 2021年01月22日
iOS定位SDK提供后台持续定位的能力,可持久记录位置信息,适用于记轨迹录。
第 1 步,引入头文件
在调用定位功能的类中引入AMapFoundationKit.h和AMapLocationKit.h这两个头文件,注意Swift需要在桥接文件中引入头文件:
#import <AMapFoundationKit/AMapFoundationKit.h>

#import <AMapLocationKit/AMapLocationKit.h>
//在桥接文件中引入头文件
#import <AMapFoundationKit/AMapFoundationKit.h>

#import <AMapLocationKit/AMapLocationKit.h>
第 2 步,配置Key
在调用定位时,需要添加Key,需要注意的是请在 SDK 任何类的初始化以及方法调用之前设置正确的 Key。
如果您使用的是定位SDK v2.x版本需要引入基础 SDK AMapLocationKit.framework ,设置apiKey的方式如下:
iOS 定位SDK v2.x版本设置 Key:
[AMapServices sharedServices].apiKey =@"您的key";
AMapServices.shared().apiKey = "您的key"如果您使用的是定位SDK v1.x版本,请您尽快更新。
iOS 定位SDK v1.x版本设置 Key:
[AMapLocationServices sharedServices].apiKey =@"您的key";
AMapLocationServices.shared().apiKey = "您的key"
第 3 步,更改info.plist
在info.plist的字段添加定位权限的申请,配置方式请参考手动部署部分说明。
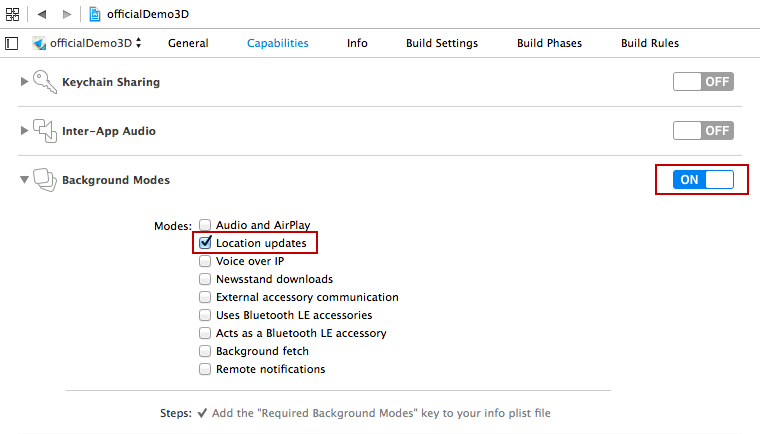
第 4 步,配置后台定位
依次执行:
a)左侧目录中选中工程名,开启 TARGETS->Capabilities->Background Modes
b)在 Background Modes中勾选 Location updates,如下图所示:
第 5 步,初始化定位
初始化AMapLocationManager对象,设置代理。代码如下:
- (void)viewDidLoad
{
    self.locationManager = [[AMapLocationManager alloc] init];
    self.locationManager.delegate = self;
}
override func viewDidLoad() {
    // 注意: locationManager为该类的属性
    locationManager = AMapLocationManager()
    locationManager.delegate = self
}
设置定位最小更新距离方法如下,单位米。当两次定位距离满足设置的最小更新距离时,SDK会返回符合要求的定位结果。
self.locationManager.distanceFilter = 200;
locationManager.distanceFilter = 200设置后台定位开启地址描述返回:
注意:在海外地区是没有地址描述返回的,地址描述只在中国国内返回。
/**
 *  后台定位是否返回逆地理信息,默认NO。
 */
@property (nonatomic, assign) BOOL locatingWithReGeocode;
第 6 步,开启持续定位
调用AMapLocationManager提供的startUpdatingLocation方法实现。
代码如下:
//iOS 9(不包含iOS 9) 之前设置允许后台定位参数,保持不会被系统挂起
[self.locationManager setPausesLocationUpdatesAutomatically:NO];

//iOS 9(包含iOS 9)之后新特性:将允许出现这种场景,同一app中多个locationmanager:一些只能在前台定位,另一些可在后台定位,并可随时禁止其后台定位。
if ([[[UIDevice currentDevice] systemVersion] floatValue] >= 9) {
    self.locationManager.allowsBackgroundLocationUpdates = YES;
}
//开始持续定位
[self.locationManager startUpdatingLocation];
//iOS 9(不包含iOS 9) 之前设置允许后台定位参数,保持不会被系统挂起
locationManager.pausesLocationUpdatesAutomatically = false

//iOS 9(包含iOS 9)之后新特性:将允许出现这种场景,同一app中多个locationmanager:一些只能在前台定位,另一些可在后台定位,并可随时禁止其后台定位。
if UIDevice.current.systemVersion._bridgeToObjectiveC().doubleValue >= 9.0 {
    locationManager.pausesLocationUpdatesAutomatically = true
}

//开始持续定位
locationManager.startUpdatingLocation()
如果需要持续定位返回逆地理编码信息,(自 V2.2.0版本起支持)需要做如下设置:
[self.locationManager setLocatingWithReGeocode:YES];
[self.locationManager startUpdatingLocation];
locationManager.locatingWithReGeocode = true
locationManager.startUpdatingLocation()
第 7 步,接收定位结果
在回调函数中,获取定位坐标,进行业务处理。
- (void)amapLocationManager:(AMapLocationManager *)manager didUpdateLocation:(CLLocation *)location reGeocode:(AMapLocationReGeocode *)reGeocode
{
    NSLog(@"location:{lat:%f; lon:%f; accuracy:%f}", location.coordinate.latitude, location.coordinate.longitude, location.horizontalAccuracy);
    if (regeocode)
      {
          NSLog(@"reGeocode:%@", regeocode);
      }
}
func amapLocationManager(_ manager: AMapLocationManager!, didUpdate location: CLLocation!, reGeocode: AMapLocationReGeocode?) {
    NSLog("location:{lat:\(location.coordinate.latitude); lon:\(location.coordinate.longitude); accuracy:\(location.horizontalAccuracy);};");

    if let reGeocode = reGeocode {
        NSLog("reGeocode:%@", reGeocode)
    }
}